Friday 29 November 2013

delete all the transaction inside a company in Dynamics ax

To delete all the transaction inside a company in the ax 2009 follow up below steps: 
1- go to AOT
2- open the classes
3- search on  SysDatabaseTransDelete class
4- right click on the this class
5- choose open
6- click yes on the message box appear to you
7- info will appear to you "operation completed"

Dynamics AX 2012 - Data Import Using Excel Add IN

Dynamics AX 2012 - Data Import Using Excel Add IN


With the release of Dynamics AX 2012, a very important thing was to import data in AX2012 using the Excel add in. This involves a lot of planning, and technical work.

Just to ease the whole process, there are bunch of articles by  Alex Anikiev On his blog which are quite detailed with step by step procedure for importing data in AX2012 using Excel Add in. The list is as follows 

Automating the Registration of Vendor’s Items serial number in Purchase order- MS Dynamics AX


Here I am giving the recommended solution – customization for Automating the Registration of Vendor’s item serial number during Purchase receiving.(Accepting Vendor Serial numbers).


In standard AX  it becomes a tedious task to assign Vendor serial number to each item by using the split functionality, Auto create serial number and Auto create check box when the Purchase quantity is very large (More than 100). and human errors in such scenarios are obvious.
Below is one of the approaches which we can follow to customize this requirement.
  1. We need to add a new button called Import serial numbers.
  2. Go to –> PO–> Select the line–> Click Inventory button –> Registration option


3. When the user clicks on Import serial numbers button, system will open the file browsing dialog as shown below.

New customized File open dialogue

4. User will browse and select the .CSV file for the item serial numbers. After clicking Ok on the file browsing dialog, system will display an intermediate form which will show the item records as shown below. This will show warehouse, location, Serial number, and the split quantities.

CSF file received from Vendors.
5. When user clicks OK button, system will load these records to the Registration screen as shown below. And click on posting will complete the item registration.


Creation of Item or Product and Product master in Dynamics AX 2012

Here we are going to discuss how to create a product and Product master(Items).

In 2012, ‘Item’ is replaced with ‘Product’. One cannot find an item master in Inventory Management Module, there is a separate module for item/product creation. The Name of that module is ‘Product Information Management’.
There are two types of Products in 2012. They are
1. Product
2. Product Master
1. Product:
These are clearly identifiable products that do not have variations associated with them. You can think of them as standard or base products. Use the Products list page in the Product information management module to view and manage products.
2. Product Master:
These serve as templates or models for variants. The variants of a product master can be either predefined or created in sales scenarios by using a product configurator. A product master is associated with one or more product dimensions, or for some configurators, product attributes. Use the Product master’s list page in the Product information management module to view and manage product masters
To access Product and Product Masters go to Product Information Management à Common Forms à Products à Products /Products Masters.
 
Product Creation Process:
  • To create product go to Product Information Management à Common Forms à Products à Products.
  • Click on New Button, a new product form is opened. In that form select the product type as Item/Service.
    • Item- A Tangible item which has inventory transactions and On-hand inventory.
    • Service- an Intangible item which has no On-hand inventory.
    • Now select Product sub-type, (note- if you open new product form from ‘all products and product master’ then you will be displayed with two option product/product masters in this drop down menu)
    • Enter Product Number.
    • Press ok and the current form closes and a new line is created in the products list page.

Product/Product Master Creation Process:
  • To create product go to Product Information Management à Common Forms à Products à Products.
  • Click on New Button, a new product form is opened. In that form select the product type as Item/Service.
    • Item- A Tangible item which has inventory transactions and On-hand inventory.
    • Service- an Intangible item which has no On-hand inventory.
    • Now select Product sub-type, (note- if you open new product form from all products and product master  then you will be displayed with two option product/product masters in this drop down menu)
    • Enter Product Number and all the related fields.
    • In the product variants section, select product dimensions group and configuration technology.
    • Press ok and the current form closes and a new line is created in the products list page.


Assigning Dimensions Groups to a Product Master:
  • In the product list page, double click on the product.
  • In the product details form opened, on the top of the form you will find Dimension Group Button.
  • Click on Dimensions group Button will open a drop down menu.
  • In the drop down menu you find three fields
    • Product Dimension group
    • Storage Dimension group
    • Tracking Dimension group
    • Select the appropriate groups from these menus.
 
Note:
Please don’t get confused between a ‘Product’ and ‘Product Master’; they are two different product types in AX 2012.
We can assign Product ‘Dimension Group’ to ‘Product Master’ but we can’t assign ‘Dimension Group’ to ‘Product’. ‘Product’ is a unique item which doesn’t have any variants.
Creating Product Dimensions and creating dimension combinations:
  • In the product details form, in the product master field press product dimensions button.
  • In the Product dimensions form in the left pane, all the dimensions related to that product will be displayed.
  • Click on one dimension, the right pane will display the dimension already entered if any.
  • If you are entering dimensions for the first time, the right pane will be empty.
  • Now press new button, a new blank line is created. Enter the dimensions.
  • For example, if you select configuration in the left pane then enter the configuration dimension of the product in the right pane.
  • Similarly repeat the steps for all the product dimensions.
 
Product dimension combinations (Product Variants):
  • Once you create all the dimensions for a product, in ax 2009 we need to create item combinations.
  • Similarly in ax2012 we use Product Variants.
  • You can find product variants button in the product master section of the product master details form.
  • Please refer to the below screenshot
  • In the product variants form, you can create product dimension combinations using two methods,
    • By directly clicking on new button and selecting appropriate configurations. (OR)
    • By clicking on ‘Variant Suggestions’ will open a new form displaying all the possible combinations. Just check the select checkbox on the combinations you want and press OK.
Release product to legal entities:
  • Once you have created the product you need to release that product for use by your companies.
  • To release a product, go to that product in the product master form and on the top of the form in Product Authorization section press on ‘Release Product for Legal Entities’ button.
  • Release Products form is opened. Please see the screenshot for your reference.
 
  • In the left hand side of the form, press ‘select products’. In the right hand side, all the products will be displayed. Further right to that, you will find all the product variants.
  • Select the required products or product variants.
  • Now Press ‘Select Companies’ from left hand side pane.  All the companies in the ax will be displayed.
  • Now select the companies in which you want to use this product and after finishing press OK.
  • Now you have Released your Product for further use.
Assigning Item Model Group & Item Groups to a Product Master:
  • In the Released products form (go to product information management module à common forms à Released Products) select your product and click on ‘Edit’ button on top left.
  • In the Released product details form, in the General Fast Tab , you will find ‘Item Model Group’ Field
  • From the drop down menu, select an item model group.
  • In the same form , in ‘Manage costs’ tab posting, field you will find ‘Item Groups’ Field.
  • From the drop down menu select an Item Group.
  • Now the item or Product or Product master is ready for further transactions.

Changing Item Dimension group for already existing Item In Dynamics AX


Here I am going to explain the process as how we can change Item dimension group for an Item which already has some transactions. (We can remove or add only these Storage dimension- Batch number, Serial number, Pallet ID and Location dimension )
  • Prepare a list of Items which needs a change for Dimension group (Say Dim1).
  • Create a new Item Dimensions groups (say Dim2) same as Dim1. But for Storage diemensions which are going to be removed needs to have Blank Receipts allowed and Blank Issues allowed check boxes selected.
  • Replace Dim1 with Dim2 for required Items in Item form, General tab.
  • Create a new Counting Journal
  • Click lines and enter the items.
  • If you are changing Dimension group for many Items at a time then click Create button in this form and select Items or On-hand option as per  your requirement.
  • Enter ’0′ in Counted field for the Item lines in the counting journal  (you can also create Movement journal with Negative quantity for required Items and post the Journal)
  • post the journal. Now we have Zeroed or nullified inventory for these items. (We have removed Inventory for these items)
  • Now change Dimension group for these required Items to a new dimension group as per your requirement (Say Dim3).
  • Now post a Movement journal with Positive quantity with required dimensions selected in Dim3.
  • Now we have Items into inventory with changed storage dimensions.

Zero Inventory-Inventory and Financial values in reports of MS Dynamics AX 2009-Axapta


Now I am going to explain the root cause for the display of Financial and Inventory values in reports– Physical inventory by Inventory dimension and Inventory value by Inventory dimension.
This type of issues happens to items whose Dimension group’s Storage dimensions like Serial number or Batch number line’s Physical Inventory and Financial inventory check boxes status is False or Unchecked or unselected. And for the items whose Inventory model group is “Weighted average method”.
To validate this, request you to create two items with different Dimenstion groups. one Dimension group with Physical and Financial inventory check boxes “Selected” for Batch number and another Item with Dimension group with “Unselected”
First create  a Dimension group called “uncheck”. In this dimension group  Activate site, ware house and Batch number. For this Batch number un check  the physical inventory and financial inventory checkboxes as shown in below screenshot.
Image
Create an item  “0001 uncheck” and assaign above newly created Dimension group and Weighted Average method  Inventory model group.
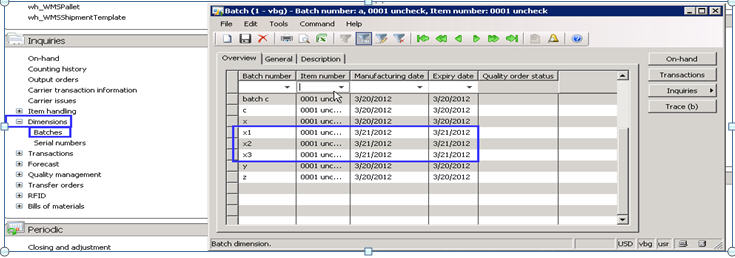
For this ‘0001 uncheck’ item create  3 batch numbers  X1,X2 and X3
Image
Create a purchase order for this item “0001uncheck” with 3 batch numbers (X1, X2 and X3.) with prices as shown in below screenshot. Invoice the purchase order.
Image
Now create and post Invoice a sales order for the item “0001 uncheck” for the same batch numbers purchased in Purchase order
Image
Now total purchased items were sold.
Now Go to Inventory Management>Common forms>Item details>Select the above used Item>Click On-Hand button>Click On-hand tab form>view Physical cost amount and Financial cost amount fields- No values. Find the on hand physical and financial inventory  are 0 (Zero).
Image
Now Go to the  Inventory management –>Reports> Status>Physical inventory by inventory dimension> select Today’s date in As on field> Select Site, Warehouse and Batch number check boxes on the report dialogue>Select ‘0001 uncheck ’ item in Item number field>Click OK> view the report out put>Report has values in Physical and Financial Inventory fields as shown in below screenshots.
Same functionality holds for report Inventory value by Inventory dimension.
Image
Image
Create another Item say “0001 check ” with Dimenstion group whose Batch number is active but Physical and Financial Inventory check boxes are selected or Status “True”.
Image
Create a Purchase order for newly created Item “0001 check” with three lines each with 10 quantity and different values and Post Invoice for the same.
Create and Post Invoice for the sales order for the total On-hand 30 items.
The difference between two scenarios is Dimension group “Batch number” Physical and Financial Inventory check boxes status. And rest is same.
Now Go to Inventory Management>Common forms>Item details>Select the above used Item>Click On-Hand button>Click On-hand tab form>view Physical cost amount and Financial cost amount fields- No values. Click the on hand tab Physical and Financial inventory  are 0 (Zero).
Image
Now Go to the  Inventory management >Reports> Status>Physical inventory by inventory dimension> select Today’s date in ‘As on’ field> Select Site, Warehouse and Batch number check boxes on the report dialogue>Select ‘0001 uncheck ’ item in Item number field>Click OK> No  report is generated.
Same functionality holds for Items having Serial number dimension  acitivated with Inventory and Financial check boxes checked or unchecked.

Removing Financial Cost Amount for items with Zero Stock/Inventory in MS Dynamics AX 2009

  • Now I am going to explain about the display of values (Amount) in Financial cost amount field for the Items with zero On-hand inventory and how to fix this issue. This is my approach to fix this issue (clear the value) and is developed by us. There might be better approach than this and this is one among them.
  • Before starting with the process please perform Inventory Closing to settle all the unsettled transactions.
To adjust ‘Financial Cost Amount’, please perform the steps mentioned below:
  • Go to Inventory Management à Periodic à Click on Closing and Adjustment.
  • In the ‘Closing and Adjustment’ form, click on ‘Adjustment Button’ and select ‘Transaction’. This will open ‘Adjust Transactions’ Form.
  • In the ‘Adjust Transactions’ Form, Click on ‘Select’ Button. It will open ‘InventTransAdjustment’ Form.
  • In the ‘InventTransAdjustment’ Form please enter all ‘Item numbers ‘which requires adjustment of the financial cost amount(please separate the item numbers  by a comma) in the Field highlighted by a Blue box and press ‘OK’
  • Now you can see the transactions for the selected items in the ‘Adjust Transactions’ Form. (You need to scroll down to see the transactions for different items)
  • Enter the Value Displayed in the ‘Financial cost amount’ field from the ‘On-Hand Form’ of that particular item in the Edit Now Field in the ‘Adjustment transactions’ Form.
In the below screenshot we have selected item ‘RE018003’. Here we need to enter the Financial Cost Amount in the ‘Edit Now’ Field of ‘Adjustment Transactions’ Form. But in this case the posted value for that line is 2094 and we are trying to deduct 3100 from that which is not possible the AX will throw an error
  • So if the ‘posted value’ is less than the amount which we want to adjust please divide the Amount and enter the remaining Amount in the next line.
(Note: Please make sure not to enter an amount greater than that of the ‘Posted value’ in the ‘Edit Now’ Field.)
Please refer to the below screenshot. Here we have divided -3100 to -2000 and -1100
  • Please repeat the above two steps for all the remaining items.
  • Once you are done with entering the amounts in the ‘Edit Now’ Field, Click on the ‘Post’ Button.
  • Once you post the Adjustments, the ‘Adjust transactions’ Form will automatically close and a new line of type ‘Posting’ is created in the ‘Closing and Adjustments’ form. Now click on ‘Settlements’ Button.
  • Note: Until this step it is normal AX Functionality, but in the following steps it involves you to develop new Buttons as mentioned in the Beginning.This process requires you to develop some scripts using your technical consultant to change the value in the ‘Value Open’ field in the Transaction lines Form. Inventory managementàcommon placesà Item detailsà Transaction button àGeneral Tab à Posting field à Value open.
  • If the ‘Value open’ Field is set to yes then it will be considered for future ‘Recalculations / Inventory Closings’ and Vice Versa. So it is very important for you to develop a new functionality through which you should be able to change the value in this field.
  • In the ‘Settlements’ Form we need to add two new buttons (please refer to the below screenshot)
  • Lock Button: used to Lock the Selected/ALL Transactions from any future inventory ‘Closing/Recalculations.(This Button should make the ‘Value Open Field to ‘NO’).
  • Unlock Button: used to ‘Unlock; the Transactions that are ‘Locked’.
  • We have added the option of selecting All or Multiple settlements for ‘Lock/Unlock’.
  • Once you click on ‘Lock/Unlock’ Button will Display Two options :
  • Lock grid transactions – will Lock all the settlements present in the ‘Settlements’ Form.
  • Lock selected transactions – will Lock the selected settlement lines.
  • (Note: To select multiple settlement lines press ‘CTRL’ key and click on the required lines)
  • All the adjustments are displayed in the settlement form which are posted in the ‘Adjust Transactions’ Form.
  • In the screenshot you can observe the field ‘Value open’ is having status ‘Yes’ this means these settlements can be considered for the Future ‘Closing/Recalculation’ of the inventory.
  • Now click on ‘Lock’ Button and select ‘Lock grid transactions’.
  • once the settlements are ‘Locked’ it will display an infolog showing the LotId’s of the settlement lines that are locked. You can also observe that in the ‘settlements’ form , the value open field will display status as ‘No’ for the Locked settlements.
  • All the lines which have the ‘Value open’ status as ‘NO’ will not be considered for the future inventory closing/recalculation.
  • Now you can cross check the same by performing recalculation for the items which you have made adjustments, it should not change the ‘Financial Cost Amount’ of any item.
  • Note: As the decimals are rounded off to two digits, we might not adjust the exact amount and still fraction of the amount will be still present in the ‘Financial Cost Amount’ Field. We can ignore that value.

Creation and Posting of Purchase order in MS Dynamics AX 2012

Here I am going to explain  normal Purchase order posting in MS Dynamics AX 2012. when compared to earlier version of AX there are much changes in AX 2012 with respect to UI design and navigation as well.

Process is explained below with screenshots.
Navigate to Procurement and Sourcing OR Accounts payable module —> Common –> Purchase order—>All Purchase order details—> Click Purchase order icon in the Action pane, Purchase order tab, New group.
1
A new Create Purchase order form is opened—> Select Vendor account and fill relevant information in applicable fields—> Click OK as shown in below screenshot.
image
Now Purchase order header is created. Purchase order form as two icons in action pane called Header view and Line view in Purchase order tab, in Show group as shown in below screenshot. Here we cannot see both Header and Lines, but we can see only one at a time.
image
Now select Lines view and select Item in Purchase order lines section. Enter Quantity and price.
To Confirm the purchase order:
Go to Purchase tab in Action pane of Purchase order form —> Select Confirm Icon in Generate group as shown in below screenshot.
image
To view print preview of purchase order confirmation –> Click Purchase order  confirmation option or Icon in Journals group of Purchase order action pane as shown in below screenshot.
5
To post Receipt list
Go to purchase order form—> select Receive tab in action pane—> click Posting receipts list icon—> Posting receipts list form opens –> Click Ok button—> Purchase order Receipt list is posted.
image
To view print preview of Receipt List. Go to Purchase order form—> Receive tab in action pane –> Select Receipt list in Journal group.
image
Post packing slip or Product receipt.
In Ax 2012 packing slip is called as Product receipt. But Packing slip name remains as same in Sales order process. To post Product receipt, Go to Purchase order form—> select Receive tab in Action pane—> select Product receipt icon as shown in below screenshot—> Posting Product receipt form opens—> Enter related number in Product receipt field –> Click Ok button.
image
To view print preview of Product receipt copy. Go to Purchase order form—> Receive tab in action pane –> Select Product receipt in Journal group—> Product receipt journal opens –> click Preview/print icon—> select Copy if you want to print copy of an invoice or Original if you wish to print the original Invoice. 
image
Now final step in Purchase order Posting Invoice
Go to Purchase order –> Invoice tab in action pane—> select Invoice icon in Generate group –> Vendor Invoice form is opened—> Select Vendor Invoice fast tab—> Enter Invoice number in Number field in Invoice identification section—> click Post icon in the ‘Actions’s group in action pane as shown in below screenshot
image
To view print preview of Invoice copy Go to purchase order form—> click Invoice tab on action pane—>select Invoice  option in Journals group—> Invoice journal form is opened –>select overview tab –> select Preview/ Print option—>select from Copy/original invoice as per your requirement—> preview the Invoice copy
image
Now we have covered all phases of Purchase order like Confirmation, Receipt list, Product receipt (Packing slip in 2009) and Invoice posting. This is a normal or simple Purchase cycle of an item in AX 2012.

SQL/SSRS Interview questions I thought of blogging some SQL/SSRS interview questions.

Below are some. I will add more, when I complete the compilation 1. What is OLTP(Online Transaction Processing)? OLTP stands ...