Tuesday, 24 December 2013

DialogEnumComboBox class in AX 2012 [X++, Restrict Enum elements in the dialog fields]

We all know there are various ways of doing this in AX 2009, but in AX 2012, We have a new class which will help to easily achieve this through DialogEnumComboBox class.

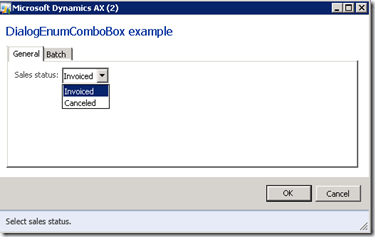
As you see below, the sales status drop down will only show the Canceled and Invoiced elements though the enum has more elements in it.
image
Now, lets see how to do this. Create class and methods as shown below.
public class TestDialogEnumComboBox extends RunBaseBatch
{
    DialogEnumComboBox  dialogEnumComboBox;
    DialogField         dialogType;
    DialogRunBase dialog;
    SalesStatus salesStatus;

    #define.FieldNoTmp(600)
}
public Object dialog()
{
    Set enumSet = new Set(Types::Enum);
    dialog = super();

    dialogType = new DialogField(dialog, enumStr(SalesStatus), #FieldNoTmp);   
    dialog.addCtrlDialogField(dialogType.name());
    dialogType.init(dialog);
    dialogType.label("Sales status");
    dialogType.helpText("Select sales status.");
    dialogType.value();

    enumSet.add(SalesStatus::Canceled);
    enumSet.add(SalesStatus::Invoiced);

dialogEnumComboBox = DialogEnumComboBox::newParameters(null, dialogType.control().id(), enumNum(SalesStatus), enumSet, dialog.form());

    return dialog;
}
public void dialogPostRun(DialogRunbase _dialog)
{
    super(_dialog);   
    _dialog.dialogForm().formRun().controlMethodOverload(true);
    _dialog.dialogForm().formRun().controlMethodOverloadObject(this);
    _dialog.formRun().controlMethodOverload(true);
    _dialog.formRun().controlMethodOverloadObject(this);

    if (dialogEnumComboBox)
    {
        // Specify the formRun (at this point the formRun is already available)
        // This is needed to track selection in the comboBox
        dialogEnumComboBox.parmFormRun(dialog.dialogForm().formRun());

        // Select a specific entry in the comboBox, if needed
        dialogEnumComboBox.select(SalesStatus::Invoiced);

    }
}
public boolean getFromDialog()
{
    boolean ret;
    ret = super();

    if (dialogEnumComboBox)
    {
        salesStatus = dialogEnumComboBox.selection();
    }
    return ret;
}
client server static ClassDescription description()
{
    return "DialogEnumComboBox example";
}
public static void main(Args _args)
{
    TestDialogEnumComboBox testDialogComboBox = new TestDialogEnumComboBox();

    if (testDialogComboBox.prompt())
    {
        testDialogComboBox.run();
    }
}
public void run()
{
    info(enum2str(salesStatus));
}
How change the color of entire row

We can override the displayOption() method of the form's datasource to change appearance of any row in the grid. U can set either the

foreground or the background color of the row.
public void displayOption(Common _record, FormRowDisplayOption _options)
{
    Test  _test;//Table Name
    noyes       value;
    ;
   _test = _record;
    if(_test.SOqty > _test.POqty)        value = NoYes::Yes;     else         value = NoYes::No;
    switch(value)
    {
        case NoYes::Yes :
         _options.backColor(WinAPI::RGB2int(255,0,0));
        break;
        case NoYes::No :
        _options.backColor(WinAPI::RGB2int(255,255,255));
    }
    //super(_record, _options);
} 
in this case where ever saleQty is greater than PurchQty then that entire row will change to red color.maximun this color display option will help for retails forms.

How to change the color of a single colum in Ax forms

We can override the displayOption() method of the form's datasource 

to change appearance of any column in the grid.

For highlighting one or more cells, override the displayOption()  use

_options.affectedElementsByControl() method.

 //if it is condition based
public void displayOption(Common _record, FormRowDisplayOption _options)
{
   Test            _test;
    noyes          value;
    ;
    _test = _record;
    if(_test.SO > _test.PO)
        value = NoYes::Yes;
    else
        value = NoYes::No;
    switch(value)
    {
        case NoYes::Yes :
         _options.backColor(WinAPI::RGB2int(255,0,0));
        _options.affectedElementsByControl(Test_PO.id());
        break;
        case NoYes::No :
        _options.backColor(WinAPI::RGB2int(255,255,255));
       _options.affectedElementsByControl(Test_PO.id());
    }
}

//if no condition
public void displayOption(Common _record, FormRowDisplayOption _options)
{
  _options.backColor(WinApi::RGB2int(0,255,0));
  _options.affectedElementsByControl(Control1.id());
  _options.affectedElementsByControl(Control2.id());

PAN No validation in Ax 2009

Hi,

     In Employee Details we can customize a string field  called PAN No.for that field we need some validation.

1.EmplTable --> Add a new string Field named  PAN No.
2.Add this field in EmplTable form design.
3.In EmplTable  form DataSource -->PAN No-->Modified method .
4.write the following code in modified method

public void modified()
{
    EmplTable   _emplTable;

    ;

    #define.alphabets('ABCDEFGHIJKLMNOPQRSTUVWXYZ')
    #define.numbers('0123456789')
    #COSNumbers
    if (( EmplTable.PANNO )&&
   ((strkeep(substr(EmplTable.PANNO, #1, #5), #alphabets) != substr(EmplTable.PANNO, #1, #5))         ||
        (strkeep(substr(EmplTable.PANNO, #6, #4), #numbers)   != substr(EmplTable.PANNO, #6, #4))
        ||
        (strlen(EmplTable.PANNO) != #10) 
        ||
 (strkeep(substr(EmplTable.PANNO, #10, #1), #alphabets) != substr(EmplTable.PANNO, #10,#1))) )
    {

       Throw error("@GLS5849");
    }

    select _emplTable where _emplTable.PANNO == EmplTable.PANNO
                                       && _emplTable.EmplId != EmplTable.EmplId;
    if (_emplTable)
    {
        if(_emplTable.PANNO)
        Throw error("PAN Number already exists");
     }

    super();
}

 *****************
create following lable
@GLS5849 = The Permanent Account Number (PAN) must be alphanumeric with 5 alpha, 4 numeric, and 1 alpha characters.
******************

Password style Dialog s and validate the password in Active Directory [Dynamics AX, X++]

Note: AxaptaUserManager class is used to validate the password.This class is also helpful to generate passwords, validate domain etc.

Below is how the dialog looks with password style dialog fields.

static void PasswordDialogs_validateADUser(Args _args)
{
Dialog d = new Dialog(“Password style dialogs and validate password in Active directory”);
DialogField dfPass1, dfPass2;
UserInfo userInfo;
AxaptaUserManager axUserManager;
;
dfPass1 = d.addField(typeid(password), “Enter password”, “Enter password.”);
dfPass2 = d.addField(typeid(password),”Re-enter password”, “Re-enter your password to validate”);
dfPass1.passwordStyle(true);
dfPass2.passwordStyle(true);
if (d.run())
{
userInfo = xUserInfo::find(false, curuserId());
axUserManager = new AxaptaUserManager();
if (strcmp(dfPass1.value(), dfPass2.value()))
throw error(“@SYP1505″);
if (axUserManager.validatePassword(userInfo.networkAlias , userInfo.NetworkDomain, dfPass1.value()))
{
info(“Password matches with the Active directory password :)”);
}
else
{
warning (“Password doesn’t match with the Active directory password :(“);
}
}
}

Wednesday, 18 December 2013

Create a “Go to the Main Table Form” option

Go to the Main Table Form is a feature of Dynamics AX, which allows users to jump to the
Parent record by right-clicking on the field and selecting the Go to the Main Table Form
option. It is based on table relations.
1.  This Link (Go to the Main Table Form) automatically creates when we define foreign key relationships with other tables.

Example: We create two tables called "TableA" and "TableB" with following field and relation. And also add few records in both tables .


Create "MenuItem" display type and set "Object" property “TableA”
And go to TableA Property and find “FormRef” property and set “MenuItem “ that we create above. After this  Create two form with name” FormA”  and “FormB”.
And now open “FormB” and right-clicking on the Id field Record and we will see “Go to the Main Table Form option” and when we click on this we will get parent record form.
2.   Above functionality will work on that fields which have foreign key relation. So if we want to add this option other fields which have no foreign key relation. For this we will override jumpRef method on form control.

public void jumpRef()
{
    TableA tableA;
    Args        args;
    MenuFunction    menuFunction;
    ;

    tableA = TableA;
    args = new Args();
    args.caller(element);
              menuFunction = new MenuFunction(menuitemdisplaystr(MenuItem3),MenuItemType::Display);
    menuFunction.run(args);
    super();
}

Visible/invisible Fields using Checkbox

If you face requirement of Visible/invisible Fields using Checkbox this post will help you. It is very simple process that i am showing in briefly step by step.

First we have to create a table that contain some fields according to figure 1 and have to keep in mind  that one field should be Enum Type and set its property “EnumType NoYesCombo”.

Figure 1 - Create a table with “Enum Type” field

Next, create a form according to figure 2 and set following property:
1. “Student_checkBox”
AutoDeclaration - “Yes”
DataSource – “Student”
DataField - “Fee”
2. Student_StudentId
AutoDeclaration - “Yes”
3. Student_Name
      AutoDeclaration - “Yes”

Figure 2 – Create form and override modified()

Finally, override “modified()” method on Student_CheckBox with following code:

public boolean modified()
{
    boolean ret;

    ret = super();
    if(Student_CheckBox.checked())
    {
        Student_StudentId.visible(false);
        Student_Name.visible(false);
     }
    else
    {
        Student_StudentId.visible(true);
        Student_Name.visible(true);
    }
    return ret;
}

Figure 3 - Result

Turn OFF/ON Synchronize database through code

Turn OFF/ON Synchronize database through code

This post will help you to turn off/on Synchronize database when making changes to AOT tables.

static void ShowSysSqlSync(Args _args)
{
    SysGlobalCache gc;
    str owner = 'SysSqlSync';
    str key   = 'ShowSysSqlSync';
    boolean showEnabled = false; //set to true to enable.
    ;
    gc = appl.globalCache();
    gc.set(owner, key, showEnabled);
    info(strfmt('Show SqlSync: %1', gc.get(owner, key)));
}

You can find more details about Synchronize database from below link.

How to Hide Enum Element Dynamically on formControl

This post will help you to Hide Enum Element Dynamically on formControl .  This situation require when we have an enum with values Element1, Element2 and Element3. And we want to use this enum on two different places and Element2 is not require in one place. So we can hide element2 at run time using following code.


1.       Create a ComboBox on formControl and set property “EnumType –ItemType”
2.       Override enter() on created ComboBox and write this code:

this.delete(enum2str(ItemType::BOM));
 super();


3.       Now run form and check.

Form as a lookup with multi-tab Page lookup


Step 1: Create a Form for lookup called “CustVendLookup” with following designs:

\
Figure 1 Create CustVendLookup

Step 2:  Override run() and init() methods on "CustVendLookup" Form and write below code-
                 public void run()
                 {
                         FormStringControl callingControl;
                         boolean           filterLookup;
                         ;
                         callingControl = SysTableLookup::getCallerStringControl(element.args());
                         filterLookup =   SysTableLookup::filterLookupPreRun(callingControl,
                                                                                        AccountNum,CustTable_ds);
                         super();
                         SysTableLookup::filterLookupPostRun(filterLookup,callingControl.text(),
                                                                                       AccountNum,CustTable_ds);
                }

              public void init()
               {
                       super();
                      element.selectMode(AccountNum);
               }

Step 3: Create a EDT called “CustVendLookupEDT” and set property “FromHelp – CustVendLookup” form.

Step 4: Create a table called “CustVendTable”with one field called “FromAsLookup” and set property ExtendedDataType – CustVendLookupEDT”.

Step 5: Create another form called “ChangeLookup” with below designs-

Figure 2 Create second form “ChangeLookup”

Finally, Open the “ChangeLookup” form and click on lookup with FromAsLookup field. And you will see a lookup with two tab pages Customer and Vendor.

Figure 3 : Result.

Group Specific Lookup in dynamics Ax


Step 1: Create a field with Name “ParentLevel” in VendTable string type. Create a form “VendGroupLookup” and drag- drop “VendTable” and “VendGroup” table in data source and in the VendTable data source set property  “JoinSource - VendtGroup”. Create Designs like figure 1.


Figure 1: Create VendGroupLookup form.

Step2 – create a method on “VendTable”

 public static void lookupVendorGroup(FormControl _callingControl, VendGroupId    _vendGroup)    
{
    Query                   query;
    QueryBuildDataSource    qbds;
    QueryBuildRange         qbr;
    SysTableLookup          lookup;
    ;
    query = new Query();
    lookup = SysTableLookup::newParameters(tablenum(VendTable),_callingControl);
    qbds = query.addDataSource(tablenum(VendTable));
    lookup.addLookupField(fieldnum(VendTable, AccountNum),true);
    lookup.addLookupField(fieldnum(VendTable, Name));
    lookup.addLookupField(fieldnum(VendTable, VendGroup));
    qbr = qbds.addRange(fieldnum(VendTable, VendGroup));
    qbr.value(queryvalue(_vendGroup));
    lookup.parmQuery(query);
    lookup.performFormLookup();
}

Step3 – Go to VendGroupLookup form and go to VendTable data source and go to new created field “ParentLevek” and override lookup method with this code:-

public void lookup(FormControl _formControl, str _filterStr)
    {

    ;
    VendTable::lookupVendorGroup(_formControl, VendGroup.VendGroup);
    super(_formControl, _filterStr);
}

Finally, Open the “VendGroupLookup” form and when you select group “30” you will get record as lookup that has group “30” according to figure 2.
Figure 2: Result.

Valid time state table in ax 2012

Valid time state table in ax 2012

A valid time state table property is provide you maintenance of data for which changes must be tracked at different points in time. For example where benefits become effective and expire at certain times for employee.
On a table in the AOT, you can set the “ValidTimeStateFieldType” property to “Date” or “UtcDataTime” make it a valid time state table. When you set property system automatically will add the “ValidFrom” and” ValidTo” columns which track a date range in each row. The system guarantees that the values in these date or date-time fields remain valid by automatically preventing overlap among date ranges.

Note:
  1. The "ValidTimeStateFieldType" property cannot be set for any table that inherits from another table.
  2. Each valid time state table depend on an alternate key index.
  3. The “ValidFrom” and “ValidTo” columns can both be of the date data type, or can both be of the utcDateTime data type.
  4. In X++ select statement we can use “validTimeState” keyword to filter rows by date or date range. And in Query class we can use “validTimeStateAsOfDateTimeRange ()” methods that provide filtering by date range.

Now we take simple example for understanding this functionality. First we create a new table called “EmployeeTable” and create two fields “EmplD” and Benefits like figure 1.

Figure 1. Create Table.

After, we’ll set table property’s “ValidTimeStateFieldType – Date”. Then system will automatically create two new date fields called "ValidFrom" and "ValidTo" like figure 2. Next, we'll add an index on the table, containing our EmpId identifier and the two date fields.

Figure 2. Create index.

On “EmpIdx” index set property “AllowDuplicates – No” and “AlternateKey-Yes”. After this we'll set “ValidTimeStateKey – Yes” that will enable you to set “ValidTimeStateMode- NoGap/Gap” (default to NoGap) and we’ll set “NoGap”. The NoGap value tells the system that we do not allow gaps in the date ranges. For example, for first record Jan 1 to Feb 1 and a second record of March 1 to April 1,since there would be a gap between Feb 1 and March 1.

Figure 3. Set Index property.

Now open the table and add new record. Notice how the record defaults to ValidFrom with today's date, and ValidTo set to "never". Give it a benefits  of “Bonus”  and EmpId of “0031” and save.

Figure 4. Add Record.

Now, if you create another new record, it will again default in the same date values. If we enter the EmpId "0031" again and try to save the record (CTRL+S), we’ll get the error "Cannot create a record in EmployeeTable (EmployeeTable). Insert not supported with the values specified for 'Effective' and 'Expiration'. New record overlaps with multiple existing records”. 

Figure 5. Error.

It doesn't allow this overlap of the same dates. So, change the ValidFrom field another date, and when we save the record we’ll get option like “Effective dates for one or more records will be adjusted by this change. Do you wish to continue?” 

Figure 6. Add another record.

If you select yes, you will see your previously created record will be updated so that its “ValidTo” date will be changed from never to a date that connects to your new record “ValidFrom” to one day before.


Figure 7. Change date according to previously created record.

SQL/SSRS Interview questions I thought of blogging some SQL/SSRS interview questions.

Below are some. I will add more, when I complete the compilation 1. What is OLTP(Online Transaction Processing)? OLTP stands ...