Wednesday, 18 December 2013

How to create Authentication form when the Dynamics Ax open.


n this section I’ll show you how to create authentication form when the dynamics ax open. This form will contain username and password stringEdit control fields. Both fields verify username and password for security. If you’ll enter wrong username and password dynamics ax environment will not open and if you close authentication form dynamics ax environment will automatically shutdown. I’m showing you implementing this functionality step by step-:

Step 1 – Create a form named “AuthenticationForm” with following designs.

Figure 1. Create AuthenticationForm.

Step 2 – Set below properties on form controls and buttons-
      1. Design
                 Width – 10
                 Height – 70
                 Caption – Authentication
      2. StringEdit:UserName
                AutoDeclaration  – Yes
                Label – Username
      3. StringEdit:Password
                AutoDeclaration  – Yes
                PasswordStyle - Yes
                Label – Password
      4. Button:Login
                Text – Log In
      5. Button:Cancel
               Text – Cancel

Step 3 – Override methods on buttons and form-
1. Override “close()” method on form methods and write code-
            public void close()
             {
                     infoLog.shutDown(true);
                     super();
              }

2. Override “clicked()” method on “Button:Login” and write below code-
        void clicked()
           {
                    str un, pass;
                    ;
                   un = UserName.text();
                   pass = Password.text();
                   if(un == "kamal" && pass == "jangir")
                    {
                             box::info("User name and Password correct");
                            element.closeOk();
                    }
                  else
                    {
                             box::info("User name and Password incorrect Try again");
                    }
                  super();
          }

3. Override “clicked()” method on “Button:Cancel” and write below code-
         void clicked()
         {
                 ;
                 box::info("Ax Closed");
                infoLog.shutDown(true);
               super();
        }

Step 3 – Now Go to Classes and find info class and create a new method-

static void openFormByCode2(Args _args)
{
    FormRun formRun;
    Args args = new Args();
    ;
    args.name(formstr(AuthenticationForm));
   
    formRun = ClassFactory.formRunClass(args);
    formRun.init();
    formRun.run();
    formRun.wait();
}

Step 4 – Finally override “startup()” method on info class(Classes/Info/startup() ) and add below code-
        Args _args;
    ;
    _args = new Args();
    info::openFormByCode2(_args);


Now open new dynamics ax environment and check but be careful don’t close current environment.


Number Sequence in Dynamics Ax 2012

Number Sequence in Dynamics Ax

Microsoft Dynamics AX has a number sequence framework to generate alphanumeric number sequences that are used to identify transaction documents such as sales orders, purchase order and others.

We can create number sequence with existing module or new module. For both condition, first we create a table “BookTable” with two fields “BookId” and “Name” and create index on table called “BookIdx” and drag-drop “BookId” field on it. 

Figure 1. Create BookTable

Create a form “BookForm” and drag-drop “BookTable” in the datasource and create design according figure 2.

Figure 2. Create BookForm

Now, we create number sequence with existing module or new module.

 1. Create number sequence with existing module

1.Create a EDT that extends num and Add a relation in EDT.

Figure 3. Create EDT 


2.Edit a class NumberseqReference_CustTable  and  modify “loadModule()” method

   numRef.dataTypeId = typeId2ExtendedTypeId(typeid(Book_edt));        
    numRef.referenceHelp="Unique key for the Complaint Report";
    numRef.wizardContinuous = true;  
    numRef.wizardManual = NoYes::No;            
    numRef.wizardAllowChangeDown = NoYes::No;              
    numRef.wizardAllowChangeUp= NoYes::No;          
    numRef.wizardHighest= 999999;    
    numRef.sortField = 19;       
    this.create(numRef);

3.Modify CustParameters Table and Add methods.

   static client server NumberSequenceReference numRefComplaintId()
    {
     return NumberSeqReference::findReference(typeId2ExtendedTypeId(typeid(Book_edt)));
   }

4.In the “BookForm” classDeclaration declare NumberSeqFormHandler.

5.On “BookForm”  under “BookTable” datasource – Override write(), Delete(), create() methods like:

public void write()
{   super();
    element.numberSeqFormHandler().formMethodDataSourceWrite();
}
public void delete()
{   element.numberSeqFormHandler().formMethodDataSourceDelete();
    super();
}
public void create(boolean _append = false)
{   element.numberSeqFormHandler().formMethodDataSourceCreatePre();
    super(_append);
    element.numberSeqFormHandler().formMethodDataSourceCreate();
}

6.create method on “BookForm” form methods.

NumberSeqFormHandler numberSeqFormHandler()
{
    if (!numberSeqFormHandler)
        {
            numberSeqFormHandler = NumberSeqFormHandler::newForm(CustParameters::numRefComplaintId().NumberSequence, element, BookTable.dataSource(), fieldnum(BookTable, BookId));
        }
    return numberSeqFormHandler;
}

7. Goto>Basic>Setup>Number sequences>create new Number sequence code and set fields according to you
8. Goto> References>find new number sequence reference and set number sequence code field.


2. Create number sequence with new  module

1.Create a EDT that extends num and Add a relation in EDT
2.Modify numseqmodule Enum and a element “Book”.
3.Create  a class NumberseqReference_Book  that extend NumberSeqReference class and  Add loadModule() method and numberSeqModule().

protected void loadModule()
{
    NumberSequenceReference numRef;
    ;
    /* Setup Book Details */
    numRef.DataTypeId = typeId2ExtendedTypeId(typeid(Book_edt));
    numRef.ConfigurationKeyId = configurationkeynum(Test);
    numRef.ReferenceHelp ="Unique key for test identification. ";
    numRef.WizardManual = NoYes::No;
    numRef.WizardAllowChangeDown = NoYes::No;
    numRef.WizardAllowChangeUp = NoYes::No;
    numRef.SortField = 1;
    this.create(numRef);
}
public static client server NumberSeqModule numberSeqModule()
{
    ;
    return NumberSeqModule::Book;
}

4.Create  “BookParameters” Table and Add methods

client server static NumberSequenceReference numRefBookId()
{
    return NumberSeqReference::findReference(typeId2ExtendedTypeId(typeid(Book_edt)));
}
Figure 4. Create BookParameters Table

5.In the “BookForm” classDeclaration declare NumberSeqFormHandler.

6.On “BookForm”  under “BookTable” datasource – Override write(), Delete(), create() methods like:

public void write()
{   super();
    element.numberSeqFormHandler().formMethodDataSourceWrite();
}

public void delete()
{   element.numberSeqFormHandler().formMethodDataSourceDelete();
    super();
}

public void create(boolean _append = false)
{   element.numberSeqFormHandler().formMethodDataSourceCreatePre();
    super(_append);
    element.numberSeqFormHandler().formMethodDataSourceCreate();
}

7.create method on “BookForm” form methods.

NumberSeqFormHandler numberSeqFormHandler()
{
    if (!numberSeqFormHandler)
        {
            numberSeqFormHandler = NumberSeqFormHandler::newForm(BookParameters::numRefBookId().NumberSequence, element, BookTable.dataSource(), fieldnum(BookTable, BookId));
        }
    return numberSeqFormHandler;
}

8. Goto>Basic>Setup>Number sequences>create new Number sequence code and set fields according to you
9. Goto> References>find new number sequence reference and set number sequence code field.


3. In Dynamics Ax 2012 it is require that Create a new job with the following code and run it to call all loadModule:

           static void NumberSeqLoadAll(Args _args)
            {
                   NumberSeqApplicationModule::loadAll();
            }

WorkFlows in Microsoft Dynamics Ax 2012

WorkFlows in Microsoft Dynamics Ax 2012 Part 1


WorkFlows:

                         Workflows is basically a business process that defines how a document flows through the system.

Below are some features related to the workflows on how can we configure the workflows and use them in our scenario.

I will show the example related to the Purchase Requisition in the Module Procurement And Sourcing.

Just go to the Procurement and sourcing > Setup > Procurement and sourcing workflows.

A new window will open as you can see that in the image below.

This page contains all the newly created Workflows.

Now Click on the new button to create new workflow.A new window will open where you have to select the type of workflows.

Select the Purchase Requisition Review and than click the Create Workflow Button.

As you can see this in the image below.


After clicking  on the workflow button A new wizard will open where you have to configure your workflow.As you can see this in the image below.


As you can see in the above image. This is the window where you can configure your Workflow.
On  the below pane there is an error pane which shows number of errors in your workflow during the configuration.You have to resolve all these errors in order to configure your workflow.

On the left hand side there is the task pane where you can use different tasks to add to your workflow.

In the middle there is the action pane where you have to drag and drop the tasks.

Now drag the Approve Purchase Requisition element on to the action pane and than connect the  start and end node to it.

As you can see this in the image below.

Now double click on the approve node in the action pane and than click on the basic settings.
As you can see this in the below image.

After clicking on the basic settings a new node will open where you have to enter basic settings.

Inside the basic settings basically there are four nodes. These four nodes are:

1. Basic Settings.
2. Assignment.
3. Condition.
4. Escalation.


1. Basic Settings

In Basic settings node you have to enter the Subject of the workflow and then information of the workflow.

This subject and description will help the approver of the document.

You can also insert the place holder into  it.

For example if i want to show the Requisition id.Than I can do that through the place holder.Than every approver of the requistion will be able to see the id of the requisition for which he has to approve or not.


2. Assignment:

Assignment is basically use to select the number users which have to approve the document.

There are four types of assignment i.,e participant,hierarchy,workflow user and user.

participants are based on the roles.you can assign this workflow to the specific role and the users in that role can approve that document or you can use organizational hierarchy or you can select the workflow user
or you can assign to the specific user (The user which is configured in AX).

In that example I will use the user option.
Now in next image you can see i am selecting the specific user that is configured in my AX.


Time Limit:

In that node you have to define certain time limit to the user in which the approver have to approve the workflow.

You can see that in the below image.


Completion Policy:

Completion Policy is basically is the policy in which we have to decide when this task is complete.

Like when only single user completes this than it complete or when all approvers approves than this task should be complete.

You can see that in the image  below.


3. Condition:

Now there is third option available is we can add the condition to start the workflow if we want.

For example there is an example that workflow should start if the requisition amount is 2000. Than you can add the condition.

you see that example in the below image.


4. Escalation Policy:

There are certain escalation policies available if the user fails to respond in the given time than  
we can make policy that it should assign to another user we can define the name of the other user or we can add the organizational hierarchy.


Conditional Decision:

You can add the conditional decision into your workflow.If the decision is true than you can end the workflow otherwise the document can go to other node.

You can see that in the below image.


Now this was all related to the configuration of the workflow.Before saving the workflow please see the error pane there should not be any single error present in it.After resolving all the errors you can save and close the workflow.There will be a dialog box appear you can add version notes in it if you want and than save it.And than activate that version.

After Creating the workflow please set your workflow as default as you can see that in the below image.

There is also version of the same workflow that you have.

Versions are basically when you modified your already created workflow than there is version created based on your modification.You can activate any of your version you want based on your modifications.

You can see that in the below image.


This was all related to the Configuration of the workflows on the client side.

I hope you like this post :)

In the next post i will show you on how can we consume this workflow while moving our document from one user to another.

In my third post related to the workflows i will also show the technical side of workflows on how can we develop our own workflows.


Info Part in Microsoft Dynamics AX 2012


Info Part is basically used as a fact box on list pages and detail pages.

 The Perfect Definition of infopart is:

An Infolog is a type of part that you use to add a collection of fields and values to the fact box pane of a form, or a preview pane of a list page.

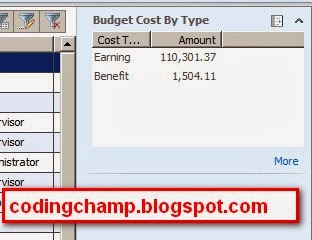
You can see the image of the fact box in the below image:


Now the Scenario is that we have to show the total of budget amount against each earning type for each position on the list page.

To do this we have to create the Query first.which fetch and calculate the sum against each earning type.

After creating the query we have to create our Info Part.

Just go to the Parts -> InfoParts node of the AOT and right click and than create new info part.

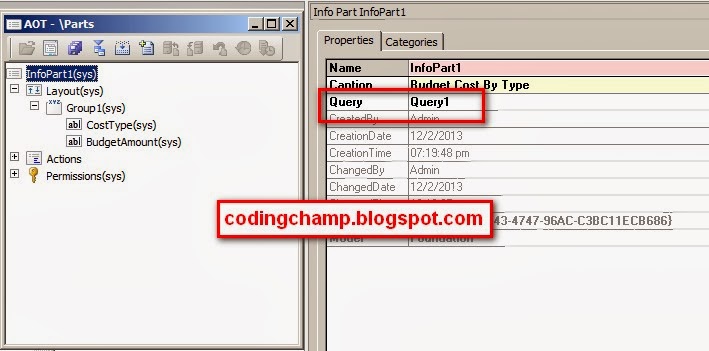
As you see this in the below image:

 Now just right click your newly created info part and than set the name of the your query that we have created in the first step.

As you can see this in the below image.


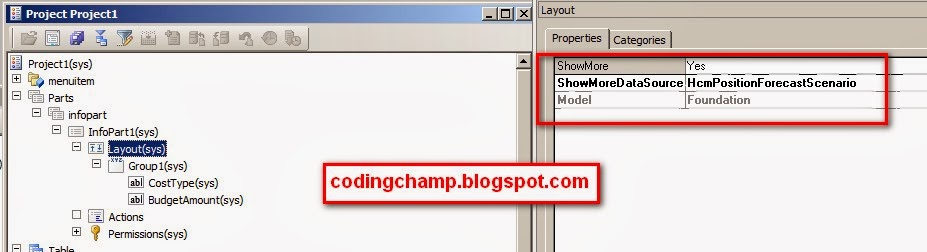
Now right click the layout node and than set the name of the parent datasource that you have made inside of your query.

As you can see this in the below image.


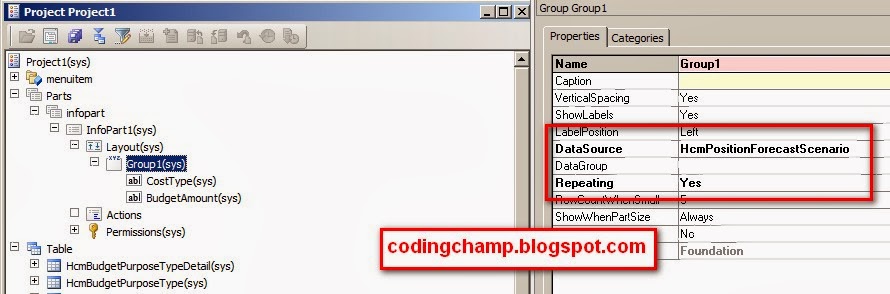
Now go to the group node and than set the name of the parent datasource and if you want to show more than one record in the fact box than you can set the repeating property to yes.

As you can see this in the below image.


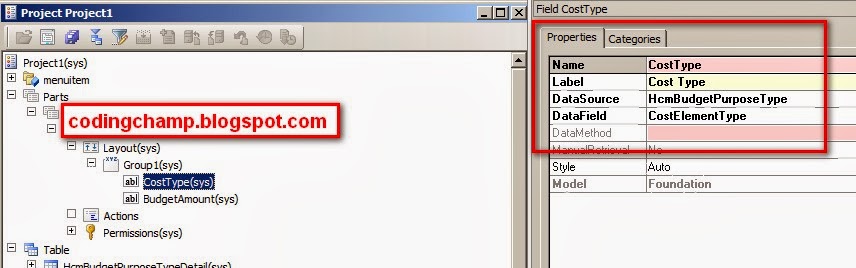
Now right click the group node and than select new field.The fields inside the group node are the fields which you want to show on the fact box.

right click that field node and than select the datasource name and the field name and than name the label to that field.

As you can see this in the below image.


Now create the menu item and than set the object type of this menuitem to info part and the object to name of the infopart.

As you can see this in the below image.


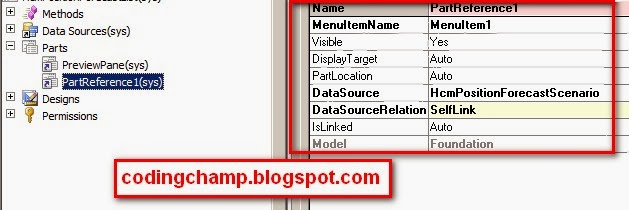
Now go to the parts node of your list page or detail page on which you want to show the fact box and than right click than create new part reference and than set the following properties.


Now open your form your fact box should be exactly like this.


Fact Box have many types I have shown only one type in this example.If you want know more about fact boxes than you can click on the below link.

Fact Box in Microsoft Dynamics AX 2012

This was all from my side related to the Info Part.

If you have any questions related to that feel free approach me :)

Thanks 

Creating Purchase Order and Invoice In Microsft Dynamics AX 2012


In the previous post we have created the product and than released that product.Now in this post we will create the purchase order of that Product and than we will create the Inoice of that product.

Below are the step for Creating Purchase Order and Invoice.

Step 1:

Just go to the Account Payable ->Purchase Orders -> All Purchase Orders

A new window will come as you can see in the below image.Then press the New Purchase Order from the action pane.


When you click the Purchase Order button the new window will come as you can see in the image below where you have to select the vendor account and than press ok.


After pressing the ok button A new form will appear where you have to select the product its quantity and price etc as you can see in the image below.


when you select the item from the above screen than an exception will create as you can see in the below image.


This issue is because we have not selected the Dimension Group while creating the product.
Now go to the  Product information management -> Common -> Released products

A new form will open as you can see in the below image.


Now select the product and than click the edit button and than select the storage dimension group,tracking dimension group and the item model group and item group as you can see in the below image.


Now after selecting these dimensions close the form and than again go to the purchase order form and than select the product as you can see in the below image.

Note: Item group option is not shown in the above image as we also have to select it.This option is in the manage cost fast tab of the above form.


Now  go to the purchase tab and press the confirm button as you can see in the above image to confirm the purchase order.It will take some time to confirm the purchase order.

Now in the next step we will create the invoice against the purchase order  click the invoice tab on the same form and than click the invoice button from the action pane as you can see in the below image.


When you click the invoice button a new form will open where you have to give the invoice number and than invoice date and and than click the post button from the action pane .A wizard will open than again you have to click the post button from the action pane.As you can see  in the image below.


 While Posting the invoice this below issue may accur i.e


The above issue is because of we have not selected the warehouse while creating the purchase order.

Again go to the warehouse form and than select the warehouse field as you can see in the below image.


Now again generate invoice of that purchase order and than post the warning will no more generaete and invoice will successfully posted.

Now our Invoicing is completed.Now I will show this product i.e 14th street pizza in our in hand inventory.

just go to the Inventory and warehouse management -> Inquiry -> On hand inventory

A new form will open where you can see the inhand inventory


This was all from my side.Thanks for visiting my blog :) :)

Thanks

SQL/SSRS Interview questions I thought of blogging some SQL/SSRS interview questions.

Below are some. I will add more, when I complete the compilation 1. What is OLTP(Online Transaction Processing)? OLTP stands ...